About
This article discusses version 0.8, as well as all minor updates (eg. 0.8.2). There is a chance that some of this information will not be valid after some time. But, my goal is to keep the basic functionality extremely similar, if not the same, throughout the lifetime of this project
mserv’s main function is to act as an abstraction layer on top of the official Mojang server binary. In other words, it shoots commands to a different program so that you don’t have to.
Whenever I searched for a way to make my own Minecraft server, and execute it on my own hardware, the only results that Google gave me completely ignored my question and just told me to purchase a hosting plan. I didn’t even know Mojang offered their own server.jar file until just recently!
While you can host your own server using just this server.jar file, I found it to be a tad clunky (All server files were generated in the working directory. You’re on your own organizing those files if you didn’t already create a new server directory), and the process could definitely be automated a bit more
mserv is a little script written in Python that is able to:
- Scan the Mojang website for the server.jar file, and download it automatically
- Organize servers into their own directories (each server and its files belong to a unique folder named by the user)
- Execute the server binary
- Provide network information to make joining the server easier
- Cute command-line UI elements (progress bars, colored text) to help make the CLI feel less intimidating, and more informative for normal people
When installed using pip, the binary is located within the computer’s PATH, which means that you can spawn new servers wherever you want, based on your current working directory.
Installing mserv
The Easy Way
The recommended way to install mserv is by using Python’s pip package manager. If you don’t already have Python installed, head on over to Python.org and install it on your computer.
As of right now, it’s recommended that you install Python version 3.8.0 or newer.
NOTE: If you’re on Windows, make sure that, at the very end of the installation, you select the checkbox that “Adds python to PATH”
Once Python is installed, run this command in your Terminal/Console
| |
Which will install everything and you should be all good to go.
Basic Usage
Simple Commands
mserv is a command-line application. For those not familiar, you have to give commands to the program by typing to it.
For example, to create a new server at the current location, you would execute this code:
| |
and mserv will guide you through the process of setting up the server.
Command List
| |
Port Forwarding
This is the part that mserv can not help you with, but its worth talking about and make sure you’re aware of it.
Essentially, port forwarding allows for your router to accept connections from the outside world. Someone that is not connected to your internet will be able to log on to your server if they know your Public IP address and the port that the server is running on. If you don’t port forward, your server will only be accessible on your network. Its great if you’re having a LAN party, but chances are you want to connect with long-distance friends too.
I can’t really offer an extensive guide for how to do this, since every router is different. You will have to do some independent research for how to operate your own device. Though, the general steps are as follows:
Figure out your server’s ip address
You’re going to want to figure out the local ip address of the computer you’re hosting the server on.
NOTE: The local IP address is the address that only works on your network. The rest of the world can’t access it.
On Windows, open a command prompt and enter the command:
1ipconfig/all
Your ip address will be under IPv4 Address
On Linux, open a terminal and enter the command:
1ip addr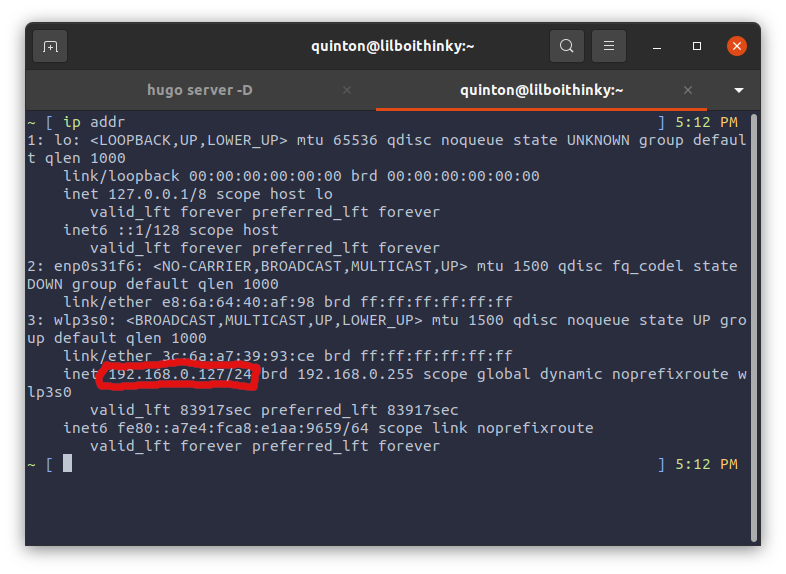
In my case, if I wanted to run my server on wifi (not recommended), I would use the ip address located under wlp3s0. That is my wireless card.
If I wanted to run on ethernet (much nicer), I would use the ip address located under enp0s31f6. Thats the name of my ethernet device.
Log into your router’s settings
You may not know this, but usually routers create their own websites that are only accessible on your network.
You can usually connect to this website by typing192.168.0.1into your web browser (again this may be different based on your router)When you get there, there will likely be a login prompt. You’re going to have to figure out what that default login and password are, since this is different for each router.
Change your Port Forwarding Settings
There should be a “Port Forward” setting for your router. Here, you will have to make use of the server IP address as well as the Minecraft port number (25525 by default).
Again, this isn’t really an all-encompassing setup guide, but it should introduce you to some concepts that will help you when you’re ready to try this for yourself.
I encourage you to to do a search and find the specifics for your router model.
Final Thoughts
As of right now, there are still lots of little typos and inaccuracies within the project. I’ve already found multiple as I write this page.
I think once I’m able to implement CI/CD for this project, little errors like this should iron-out much quicker. But, until then, feel free to create an issue on the Github repo.